Showing posts with label fashion make up. Show all posts

Monday, 12 September 2011

Perfect Winged Eyeliner For Beginners.

 I came across a really handy tip whilst doing my make up course and thought it would be perfect for those of you who struggle with winged eyeliner. Winged liner is something very classic that instantly glam up your make up. So here is my step by step guide on creating an easy wing! Or you can check out my youtube video on it here.

♡You Will Need♡
A Flat Shader Brush (I used one from Crown this step is completely optional).
A neutral eyeshadow to even out the lid (Again this is optional I used MAC Naked Lunch).
A Kohl Pencil eyeliner (I used bareMinerals Big & Bright).
A Gel or Liquid eyeliner (I used MAC'S Blacktrack Fluidline).
A pointed eyeliner brush (I used a Charles Fox one).
An angled eyeliner brush (I used ELF's Studio one).

♡Step One(Optional)♡
Apply your all over lid eyeshadow colour. For this I like to use sades like Naked Lunch, Ricepaper or Nylon from MAC. This will just neutralize the lid.

♡Step Two♡
Take your kohl pencil and start to map out where you want your eyeliner to go. Start off by going along the lash line and making that line as thick as you want, then begin to map out your wing. A good trip is to imagine your extending your lower lash line, then connect the point of the wing with the line along the lash line, this is what gives the real "Cat Eye" effect. 

♡Step Three♡
Now take your pointed eyeliner brush and put a nice amount of your gel/liquid eyeliner on it. Now start to apply the liner over the top of the line you created, pull your eye taught if you find it difficult to have control with your eye open. Do this until the Kohl is completely covered by gel/liquid along the lash line.

♡Step Four♡
 Now it's time to do your wing. A way to make this easier is to take an angled brush and bring it down from the tip of your wing. This will make it sharp and the shape of the brush is doing all the work for you. If you prefer carry on using the pointed liner brush, it's completely up to you!

♡Step Five♡
Your wing is now done, yaaaaaay! If some of the edges are a little rough take an angled brush with some concealer, apply the concealer to the edges and pat in to create a sharp wing.

So thats it, you've successfully done winged eyeliner! I hope this was useful for some of you who struggle with it. Thanks for reading and hope you've had/having a nice day.


Friday, 9 September 2011

bareMinerals Original SPF 15 Foundation Review


I was given this as a Christmas present last year in a gift set, and only just got around to picking it up and using it! I was originally discarded it because I've always thought mineral foundation was a bit gymicy and in actual fact didn't do too much. The other week I was looking through my make up collection for a face setting powder as I wanted to experiment a bit beyond the world of MAC MSF Natural! I thought I'd give this a go and fell head over heels in love! It makes the skin feel so soft, but my favorite aspect of this product is that if used as a setting powder it doesn't eradicate the gorgeous finish your foundation gives you. So your skin remains healthy and glowy but NOT shiny or overly "dewy". I like to find the perfect in between for dewy and matte skin. I don't like being totally matte but I don't like looking like an oil slick! I think the "dewy" thing can be taken too far and generally just turn into oily looking skin rater than radiant. 

Another thing I adore about this product is that it's fantastic for building up extra cover in an area. I hate over concealer but with this powder I just buff a little extra over the problematic area and BOOM instant high coverage!

I've really never found something that makes my skin look so flawless and I will definitely not be discarding mineral products in the future. I've also noticed how much my skin has improved since using this which is something to look into! Over all I honestly give this product a 5/5, I am crazily impressed and will definitely be re purchasing!

The foundation comes in at a quite pricey £23.00, BUT can be bought discounted here for £19.55!


Sunday, 15 May 2011

Veet Sensitive Skin Hair Removal Cream Review.

I used hair removal cream for the first time today and I have to say it’s much better than I thought it would be! I used the “Veet Sensitive Skin Hair Removal Cream”. My skin isn’t actually really sensitive but this one was on offer for just over three pounds and had 200ml in Boots and the 100ml one which wasn’t on offer and was four pounds something. I left it on for ten minutes, it says it works in five but to leave it one for a maximum of ten and when I checked after five minutes it hadn’t really done much. It has left my skin a lot smoother than when I shave normally and didn’t irritate my skin like sometimes shaving can do. As for when the cream was on my skin it did sting a little but definitely no where near as much as waxing! Another thing that I liked was I actually didn’t use a lot of the cream when doing the application which I was worried about and thought if one application uses up a lot of the product I won’t continue doing it as it’s a bit on the expensive side, but to my surprise it didn’t! The only thing left to find out is if it lasts longer than shaving, which it does claim to do. Overall I’m impressed and will be doing it again if it lasts!

Friday, 6 May 2011

How Expensive Is My Face?

This post is based on the make up I am wearing today and isn't necessarily what I wear everyday.

 L'Oreal Studio Secrets Anti Shine Mattifying Primer- £10.29
MAC Studio Fix Fluid Foundation- £19.50
Collection 2000 Lasting Perfection Concealer- £4.19
MAC Mineralize Skinfinish Natural- £18.50
MAC Bare Study Paint Pot- £13.50
MAC Eyeshadows in Nylon & Satin Taupe- £9.50 each
Urban Decay 24/7 Liner In Whisky- £13
L'Oreal Volume Million Lashes- £11.29
Rimmel Professional Eyebrow Pencil In Dark Brown- £2.99
Benefit Hoola Bronzer- £23.50
Benefit Bella Bamba Blush- £23.50
MAC Creme Cup Lipstick- £13.50

Total- £172.76

That total is horrendous! I dread to think how much ALL my make up comes to! I may do a challenge of a cheaper face maybe to get it halved, that will most likely be a tough one haha!

Friday, 22 April 2011

Weekly Ramble: Week 02

Photobucket
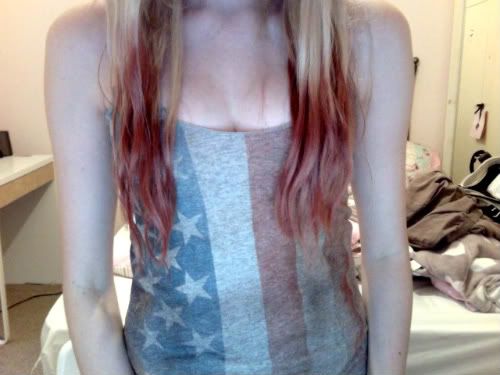
Sorry the photos of my hair not my face! I explain why below :)
Vest- Primark £3

Not a lot has happened over the past week or so!  I went to see "Your Highness" on Wednesday and it was really good! A nice comedy and I knew I would like it as it's from the makers of Pineapple Express which is one of my favorite films. 

The reason the photo is of my hair and not my face is for those of you who didn't notice, I wear hair extensions! So the dip dye bit of my hair isn't actually my hair. For the first time the other day I washed my extensions since dip dying them. I was super scared the red would fade horribly and it would just turn gross! Thankfully though it didn't, If anything it made it look better! It's made the red look a bit more faded into father then kind of block color so it's a little more ombreish now. In real life the red actually looks like a dark fuchsia pink! When my new card reader arrives I'll take a proper photo so you can see the pinkness.

It was mine and my boyfriends one year anniversary on Tuesday and unfortunately we couldn't see each other and don't get to celebrate it till Wednesday when he comes up :(! I miss him so much but I'm keeping myself busy. 
Hope you're all doing well! And I may not have too many followers right now but I'd like to say I thank all of you for following me :)


Monday, 18 April 2011

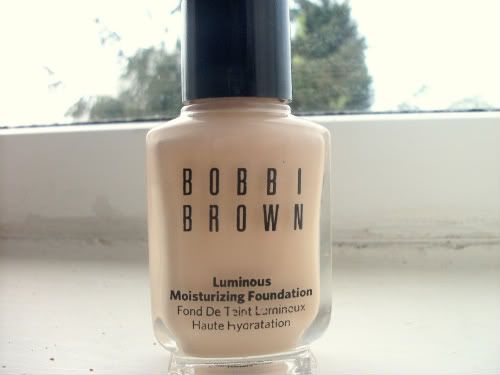
Bobbi Brown Luminous Moisturizing Foundation Review.

Photobucket
I am again sorry that the photo quality isn't as good! My new card reader is in the post.

I've always wanted to try a Bobbi Brown foundation but have never known which one to go for. A lot of people rave about the "Skin" foundation but I was scared it would be way too light for me (coverage wise). So I opted for the "Luminous Moisturizing Foundation", The website claims this foundation gives a healthy, even toned glow and is actually aimed at reducing the signs of  aging! To me this foundation smells like sherbet which can be off putting if your a person like me who doesn't like to put products with strong smells on their face! However I can get over that, the foundation finish itself is gorgeous your skin looks so healthy and hydrated with a lovely dewy finish! The coverage can be built up to medium if needed but personally I'd rather just use a little extra concealer on any nasty bits! Once the foundation sets the smells doesn't remain which is great. When the foundation arrived at my house I thought it was a sample! The bottle is so so tiny but still contains the normal foundation bottle amount of 30ml. Another thing to note is the color range is really good, I'm in Porcelain (0) but I think there's an even paler shade which is fantastic as I am super SUPER pale but this matches perfectly.

Wednesday, 13 April 2011

Dip Dye Hair

Photobucket

So I finally took the plunge and "dip dyed" my hair. After seeing image after image swaying me towards doing it I did it.  It was a lot less daunting then you would probably think it would be. I chose a more subtle color for my first dip dying attempt of a gorgeous mahogany red, and I've really warmed to it! I'll be honest at first I was a bit like "What in gods name have I done"?! Then I adjusted my make up around the new hair change (opting for more pinky toned blush, lighter eye make up) I fell in love with it. It's really brightened up my complexion and I've got quite a few compliments since making the change! Heres a photo of my new "do".